This task's objective is to propose and gather ideas about expanding the range of texturing blend modes in brushes. This doesn't propose improvements in the performance side.
Note 1: In the following, image pixel values are asumed to be in the range [0, 1], as is the strength parameter.
Note 2: All the following brush images where obtained by modifying and building Krita's code and using that custom build to create them.
1. Motivation
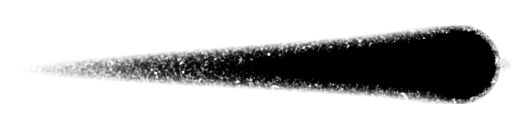
Currently in Krita there are two modes to mask a dab with a texture: multiply and subtract. These, although useful, don't seem to be enough for the needs of some users. Some threads requesting new modes or asking if some specific texture effects can be achieved in Krita appear in Krita Artists every now and then.
Now, reading those threads and from my own experience, I came to the conclussion that it is not like every texturing mode present for example in Photoshop is equally useful (or equally requested by the painters). What most of the painters want (I think) is those modes that, while applying the texture in a similar way to the subtract mode, allow to achieve full coverage in one stroke, without having to make multiple overlaping strokes (with subtract there's always some areas that remain transparent). This is what modes like overlay achieve: the texturing is stronger in the gray values and has no effect in the white and black values.
Perhaps the most requested mode is height, a Photoshop brush texturing mode that is like an extension of the subtract mode.
2. Use cases
Those kind of modes are useful for example when one wants to simulate paper grain or dry brush with low pressure and full coverage with high pressure (graphite, gouache and similar techniques).
Other examples of what people want to achieve with these kind of modes can be seen in the following links:
- https://www.davidrevoy.com/article107/textured-brush-in-floss-digital-painting
- https://krita-artists.org/t/brush-engine-is-it-possible-to-have-a-pattern-blending-mode-like-this/20130
- https://krita-artists.org/t/new-brush-s-texture-blending-modes-height/3050
- https://krita-artists.org/t/can-anyone-emulate-this-csp-brush-in-krita/20928
- https://krita-artists.org/t/help-creating-pencil-brush/20064
3. Implementation
A handful of modes can achieve the full coverage property, for example overlay, color dodge, color burn, hard mix, height. Photoshop has even more, but I found them not so useful personally. In the case those seem too much for some reason I think that the modes that should be present no matter what are overlay and height. The reasoning behind this thought is purely aesthetical: overlay gives soft transitions as multiply does, but also allows for full coverage; height is kind of an extension of subtract, so it gives harder edges while also allowing for full coverage if needed.
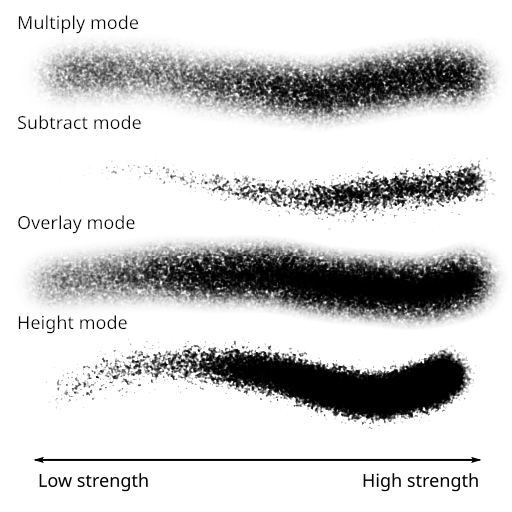
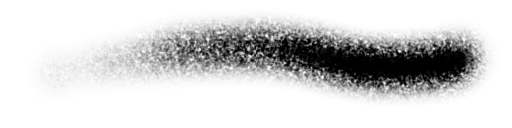
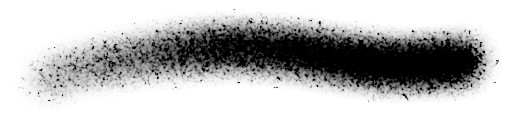
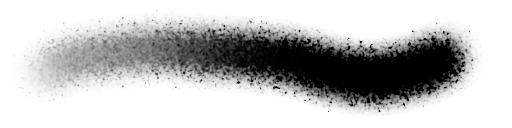
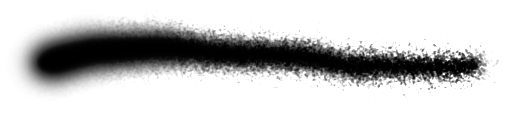
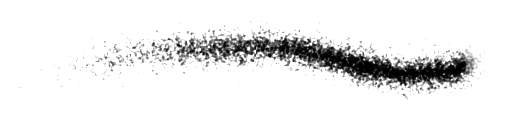
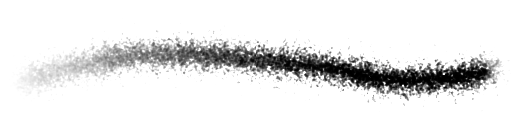
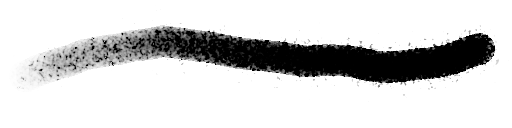
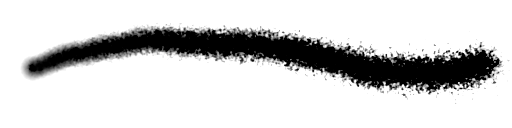
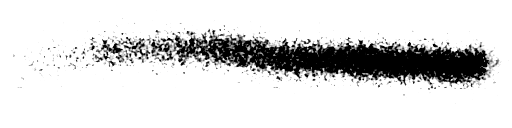
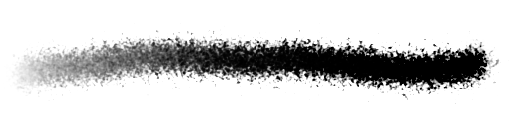
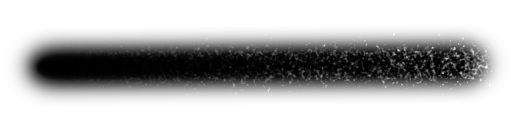
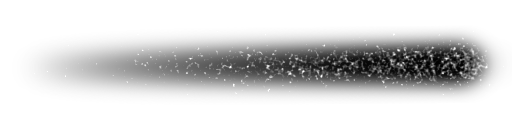
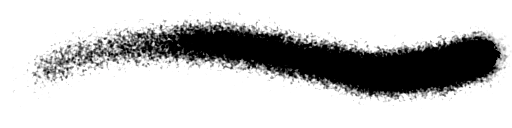
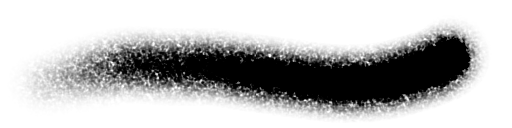
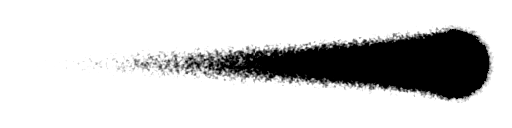
As can be seen in this image, the overlay and height modes feel like the multiply and height modes, but achieving full coverage
3.1. Traditional modes
3.1.1. Overlay
This mode is often decribed as "use multiply mode if the dst (the dab) is less than or equal to 0.5 and use screen if it is greater". But it also can be described as adding noise represented by src (the texture) to dst (the dab) following the formula dab + (tex - 0.5) * w(dab), where tex - 0.5 centers the texture values around 0 and w is w(x) = 1 - abs(2x - 1), a triangular function that weights the noise texture contribution depending on the value of the dab.
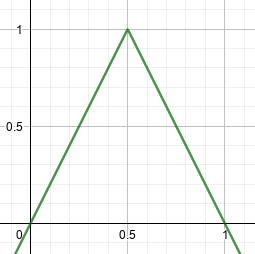
The weighting function w(x) = 1 - abs(2x - 1)
If the dab values are near 0 or 1 then w goes to 0 and so does the contribution of the texture, while if the dab values are near 0.5 w goes to 1 and the texture contribution is greater. This shows that the overlay mode can achieve full coverage, since around white areas in the dab (full opacity), the texture contribution goes to 0.
The strength parameter can be introduced in three ways:
strength as an extra weight for the texture
dab + (tex - 0.5) * w(dab) * strength
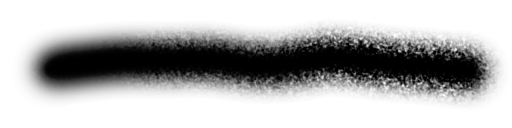
This would produce the dab unmodified when the strength is 0 and full texturing when it is 1 (this is used by Photoshop):
strength as a weight for the dab itself
dab = dab * strength
dab + (tex - 0.5) * w(dab)`
This would produce an effect similar to multiply mode in Krita, where the dab dissapears when the strength goes down. Note that the texture is also modified by the strength since the weighting function w uses the modified dab:
strength as an overall weight
strength * (dab + (tex - 0.5) * w(dab))
In this case varying the strength would give the same results as varying the flow:

I personally prefer the second option since it makes it similar to how the multiply mode handles the strength. At first one may think that option number 1 is more logical as a strength equal to 0 would leave the dab untouched/un-textured, but that's not how the other modes work in Krita, where if you use texturing but the strength is 0 then the dab vanishes.
One drawback is that the overlay mode is more complex code-wise and requires at least one if/else.
In the case where the mask pixels are 8 bit integers, a potential optimization could be made by precomputing a 256 bytes long lut with the results of evaluating w and using that in the above formula.
3.1.2. Color Dodge
The formula for color dodge is min(1, dab / (1 - tex)). When the dab color is white (full opacity), the formula becomes min(1, 1 / (1 - tex)) and since tex (the texture) is always in the range [0, 1], 1 / (1 - tex) is always greater or equal to 1. Then that value is clamped to 1.
In this case, the pixels of the dab that are fully opaque will remain fully opaque after the texturing, achieving the full coverage property.
The strength parameter can be introduced in three ways:
strength as a weight for the texture
min(1, dab / (1 - tex * strength))
This would produce the dab unmodified when the strength is 0 and full texturing when it is 1 (this is used by Photoshop):

strength as a weight for the dab itself
min(1, (dab * strength) / (1 - tex))
This would produce an effect where the dab dissapears when the strength goes down:
strength as an overall weight
strength * min(1, dab / (1 - tex))
In this case varying the strength would give the same results as varying the flow:
Again, for consistency with the other modes in Krita, I would choose method number 2.
The drawbacks are having to use an if to check if the denominator is 0 and the min function.
3.1.3. Color Burn
The formula for color burn is max(0, 1 - (1 - dab) / tex). When the dab color is white* (full opacity), the formula becomes max(0, 1 - 0 / tex), and 0 / tex is always 0, so the formula becomes 1 - 0. In this case, the pixels of the dab that are fully opaque will also remain fully opaque after the texturing, achieving the full coverage property.
The strength parameter can be introduced in three ways:
strength as a weight for the texture
max(0, 1 - (1 - dab) / (1 - (1 - tex) * strength))
This would produce the dab unmodified when the strength is 0 and full texturing when it is 1 (this is used by Photoshop):
strength as a weight for the dab itself
max(0, 1 - (1 - dab * strength) / tex)
This would produce an effect where the dab dissapears when the strength goes down:
strength as an overall weight
strength * max(0, 1 - (1 - dab) / tex)
In this case varying the strength would give the same results as varying the flow:
Again, for consistency with the other modes in Krita, I would choose method number 2.
The drawbacks are having to use an if to check if the denominator is 0 and the max function.
3.1.4. Hard Mix
3.1.4.1. Krita's Hard Mix
Krita uses color dodge when dst is greater than 0.5 and color burn otherwise in the hard mix mode so, when the dab is fully opaque, color dodge is used and the full coverage property is guaranted.
The strength parameter can be introduced in three ways:
strength as an weight for the texture
if (dab > 0.5) {
    color_dodge_v1(tex, dab)
} else {
    color_burn_v1(tex, dab)
}
This would produce the dab unmodified when the strength is 0 and full texturing when it is 1:

strength as a weight for the dab itself
if (dab > 0.5) {
    color_dodge_v2(tex, dab)
} else {
    color_burn_v2(tex, dab)
}
This would produce an effect where the dab dissapears when the strength goes down:
strength as an overall weight
if (dab > 0.5) {
    color_dodge_v3(tex, dab)
} else {
    color_burn_v3(tex, dab)
}
In this case varying the strength would give the same results as varying the flow:

Personally I don't like the look these modes (maybe I coded them wrongly?).
The drawbacks are having to use extra if's and the ones present in color dodge and color burn. They are expensive.
3.1.4.2. Photoshop's Hard Mix
If Photoshop's hard mix mode is used, the value is 1 if dab + tex is greater than 1 and 0 otherwise so, in the case where the dab is fully opaque the result will be always 1 and the full coverage property is guaranted. But that formula would produce a binary image that is too hard in the edges. I think Photoshop uses a custom hard mix for blending the texture in the brush. The resulting edges are hard but not fully. So in this section I present a hard mix mode inspired by that of Photoshop.
The basic formula is clamp(3 * dab - 2 * (1 - tex), 0, 1). As can be seen it is a modified inverse subtract mode. The 3 and 2 are chosen to approximate the contrast in the Photoshop mode but they can be changed.
The strength parameter can be introduced in three ways:
strength as a weight for the texture
clamp(3 * dab - 2 * (1 - tex * strength), 0, 1)
This is similar to the Photoshop mode:
strength as a weight for the dab itself
clamp(3 * dab * strength - 2 * (1 - tex), 0, 1)
This would produce an effect where the dab dissapears when the strength goes down:
strength as an overall weight
strength * clamp(3 * dab - 2 * (1 - tex), 0, 1)
In this case varying the strength would give the same results as varying the flow:
I like this mode much better than the one in the previous section. It is not too complex. I like the first and second variants equally.
The drawback is the clamp function.
3.1.5. Darken
The formula for darken is min(dab, tex). Even if dab is fully opaque, the result would be semi transparent if the texture is semitransparent, so the full coverage property is not satisfied. Nevertheless it produces useful effecs to cover flat areas with texture.
The strength parameter can be introduced in three ways:
strength as a weight for the texture
if (dab < tex)
    result = dab
else
    result = dab * (1 - strength) + tex * strength
or
dab * (1 - strength) + min(dab, tex) * strength
This would produce the dab unmodified when the strength is 0 and full texturing when it is 1 (this is used by Photoshop):
strength as a weight for the dab itself
min(dab * strength, tex)
This would produce an effect where the dab dissapears when the strength goes down:
strength as an overall weight
strength * min(dab, tex)
In this case varying the strength would give the same results as varying the flow:

Again, for consistency with the other modes in Krita, I would choose method number 2.
The only drawback is the min function.
3.2. Height mode
3.2.1. Height (Photoshop)
One can think of the height mode as an extension to the subtract mode, or think of the subtract mode as a special case of the height mode. The basic formulas would be max(0, dab - tex) for subtract mode and clamp(w * dab - tex, 0, 1) for height mode.
Now, in the case of brush texture, the subtract mode is modified to take into account the strength parameter: max(0, dab - (text + (1 - strength))). Note that even when the dab is fully opaque it could be modified by the texture and become semi-transparent.
Here the strength parameter adds to the texture so that when the strength is 0 an additional 1 is subtracted to the dab making it fully transparent no matter what its value was.
In height mode the strength parameter (depth in Photoshop) would control the amount of covering by acting as a multiplier. In the formula w is a value that depends on the strength: w = a * strength, where a is an arbitrary scaling factor.
The thing to note here is that when w is 1, the formula becomes the same as the subtract one, and the effect would be exactly the same as using the subtract mode with a strength of 1. When w is less than 1, the dab is scaled down (made more transparent since we are using masks), getting fully transparent when w becomes 0. When w is greater than 1, the dab is amplified (made extra opaque) so that subtracting tex from it has less effect. This is what allows this mode to achieve the full coverage property.
The factor a would control for which strength value the height mode is the same as the subtract mode. If, for example, 1 is choosen for a then the height mode would be the same as the subtract mode when the strength is 1. But this choice prevents w from becoming greater than 1 and the full coverage property can not be achieved. In Photoshop this value would be around 12.5, making the height mode the same as the subtract mode when the strength is ~0.08 (8%). This choice for a seems a bit arbitrary and maybe it could be changed. I suggest a round value of 10 for a, which will make the height mode the same as the subtract mode when the strength is 0.1.
w is constant per-dab and the formula is very simple so the implementation shouldn't be too slow.
3.2.2. Linear Height (Photoshop)
linear height is a combination of multiply and height modes, given by this formula:
w = 10 * strength
multiply = w * dab * tex
height = w * dab - tex
result = min(1, max(multiply, height))
3.2.1 Custom Height
Since the height mode is just the subtract mode but with the dab scaled, some variations could be made. I want to propose an original height mode that Daishishi came up with (the details can be read in this Krita Artists thread.
The formula is:
scaledStrength = 0.99 * strength
result = clamp((dab / (1 - scaledStrength) - (1 - scaledStrength)) - tex, 0, 1)
The dab is scaled by a reciprocal function of the strength, and then offset by a linear function of the strength. Since it uses a reciprocal function, the scale factor's range goes from 1 to infinity and the strength is scaled by 0.99 so that no division by 0 is posible and so that no super-hard edges are produced at maximum strength.
As the scale factor goes to infinity the effect can be made stronger with high strength values than with Photoshop's height mode while keeping a reasonable soft transition with medium values.
The offset is needed so that with low strength values the dab vanishes.
3.2.2 Custom Linear Height
As in Photoshop's linear height, the custom linear height is a combination of multiply and height modes, but using the custom height formula:
scaledStrength = 0.99 * strength
multiply = (dab / (1 - scaledStrength) - (1 - scaledStrength)) * tex
height = (dab / (1 - scaledStrength) - (1 - scaledStrength)) - tex
result = clamp(max(multiply, height), 0, 1)